Tuesday, 25 February 2014

How to Change the Language on Your Computer


Step 1:- click on the "start" button and select "control panel".


Step 2: Click on “Clock, Language, and Region,” then click on “Region and Language.


 \Step 3:Click on the tab labeled “Keyboards and Languages.


 Step 4 : Navigate to the section labeled “Display language,” then click on the language you want displayed in Windows.


Step 5: Click on “OK. Going forward, the Windows user interface on your computer will display in the language you selected[1].


Saturday, 22 February 2014

How to create SEO friendly Blog Posts


With upcoming and gaining information and knowledge everyone has curiosity to make
 their own blogs to share there views and ideas and knowledge but many rules
and regulations have to be followed before jumping to a conclusion.After developing
your blog you can surely earn money and that must be officially according to standards
and rules.


So I hereby briefly share some points I encountered and learned while blogging for a 
better and successful blog.

  • You must have a Eye-catching title of each post you share.
  • Establish different categories under which posts are categorized for user to effectively access posts according to need and category wise. 
  •  Stay on topic and have your posts fit into the categories you’ve established.
  • Create a meta-description using meta tag on home page as well as on each post that is fewer than 160 characters you can use dynamic meta tags .

  •  Check grammar, spelling and punctuation, and Avoid broken links.
  • “The heading structure of your pages is one of the very important aspects of on-page SEO. Hence used appropriate heading tags and wherever necessary.
  • Use Images to convey the overall feeling or emotion of your post.Use interactive clear and logical to the post images for better understanding of readers.
  • Use a unique content on your post and must be user centric.
Happy Blogging !!

How to know your own contact NO.

Now a days everyone has number of running connections for mobiles and that too of different operators.So you can't remember all the numbers you are operating on tips .So that's where these USSD codes will help you by just dialling them as per the Opearator.
You are charged nothing for this.


Dial this to know your Contact Number:-

Vodafone-*111*2#
Videocon-*1#
Bpl-*222#
Reliance-*111#or *1#
Idea-*100# or *789#
docomo-*580#
Airtel-Send sms IM to 57070 or *140*1600#
Aircel-*#1#888#
Uninor- *1#
BSNL -Call 24365 and ask them
Loop- Dial *222#
Virgin-Dial *1#
Aircel , Docomo , Reliance : Dial *1
and for airtel *140*1600#

How to boot from Pendrive

Hello guys!!
I  already shared a post regarding making a bootable pendrive for windows 7 but after that you must know how to boot from it so that's what this post will teach you.
Now You have a bootable pendrive or to make one refer to my earlier POST


Step 1 : You all might know about boot options just you have to make some changes there so that it boots from your USB Drive.

Step 2: When you Power on your System you are shown a black screen before windows Boot animation .Recognize the key or Key combination to be pressed to move to boot options.In my Laptop its F12


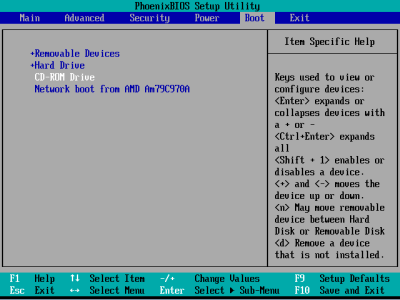
Step 3: You will be shown with several boot options.Move to Boot Tab to select specific boot option.Boot options shows you from which device you want to boot.By default It is set to boot from HDD to load OS.

Select Removable devices option this option varies from bios to bios .You can also set Boot Device Priorities in boot tab.


When you restart your system and plug your bootable pendrive it boots from it automatically.

Tuesday, 18 February 2014

How to Activate Private Browsing

To be secure over public PC you must do a secure Browsing and that's called Private Browsing.What it provides is does not store your activity.NO MORE HISTORY.I will let you know how to activate that in a mostly used Google Chrome.


Step 1: Open google chrome that's when you want to browse.

Step 2 : To activate private Browsing you have to activate Incognito Mode in browser as shown.


Step 3: You will be shown a new window and that's Private mode.

  • Remember you will not be listed with any history while browsing.
  • Neither any previously used links are listed in URL space.Hence you have to type each URL Again and Again because nothing is stored.

That's what safe for you!!.

How to Cut Video using VLC

Why to use a Seperate software to create a video clip from full video like you want to cut a song from movie .Your Video player can do that easily isn't it good.Si i will let you know how to cut part of video using VLC Media Player the most ever known .

Step 1: Almost everyone have this VLC player but if you don't have just download it from below link.

Filehippo_VLC

Step 2: Open the video in this player which you want to cut i have opened here HOBBITS one of my favourite.


Step 3: Open Advance control From the View Tab as shown


Step 4: You will be shown advance controls below seekbar


Step 5: Now Move the seek bar (forward) from where you want to start cutting or starting point of video clip you want create from existing video .
Here i have highlighted the starting point by seeking.


Step 6: Its time to use advance control.Just Press the RED Record button,first from left while video is playing.Actually a new video will be created by recording.

Step 7: Now at end point again press the record button to stop recording.
Itz done !!


You have created a new video that's a video clip from a full movie.

The video you recorded will be automatically saved in default video directory in Windows .Here its Library > Videos


Monday, 17 February 2014

How To Encrypt Drive in Windows

Hello guys !!
Everything you met with is tightened with security.More importantly you want to secure your confidential data .So that's what my post will teach you how to secure your drives , logical drives .You can do that using windows inbuilt utilities that Bitlocker Drive Encryption .
I am Using Windows 7.


Step 1: Open Control Panel 

Step 2: Select Bit Locker Drive Encryption

 Step 3: Select Drive You want to encrypt as Shown.Here i have selected drive E:


Step 4: A Dialog box will appear .
  • You must be needing a password to make it secure .
  • Check  Use password to unlock drive
  • Type and Retype Your Password and press next
Step 5: Now save your recovery key .It is important and save it in a file with second option provided there and you must mail that to your account for future security if you forgot the password.


Step 6: After that press next and start encrypting . Time taken by it will depend on the size of logical drive you are encrypting.

Its better to make a seperate small partition for encryption to store confidential data.

How to Start with ASP.NET

For those who are curious to make a website using .NET-A Microsoft Web Development platform .So here my post teaches you to make the simplest website page using IDE Visual Studio integrated with .net framework .So what you need is an IDE .Don't worry thats available easily on Microsft Website .


Step 1: Install the Visual Studio IDE .It will take 20-30 minutes to complete.

Step 2: Open the IDE and select the default development platform. You will then be displayed a Start page as shown .
I am using visual studio 2008


Step 3: To create a Web page click the first tab that's File here and select Create New Website as shown


Step 4: A dialog box will appear and select ASP.net Website .Choose the Path in which you want to save or you can use default Visual Studio Directory as i have used here. Press OK

Step 5: You will be shown A Default Page that's your first website page.You will be shown various tools on the left bar as shown here using which you can create your page creatively using colors too.


I have typed here HOWQUEST .
Remember now you are in design mode.The corresponding html code can be used using split or source code tab shown at extreme bottom.You can edit html using your skills.I have used <Center> tag here.


Step 6: Now all you want is to run your website which will use your asp.net development server 
inbuilt within visual studio .Don't worry you don't want to do any additional installations it will automatically loads in your default browser as shown.
You need to press F5 To exexute.

OUTPUT:

Wednesday, 12 February 2014

How to Open Multiple Word Documents in same Window

if you are working with a lot of ms-office word documents then you will notice unlike the older versions the Latest versions of MS-Office creates separate taskbar tabs for each document window. Switching from one document to another becomes an added stress if there are many. Here are simple ways to open multiple word documents one window for better ease of use so that you can switch between different windows while working simultaneously on both.
This article will let you know an amazing feature of MS-Office. I will let you know the steps in MS-office 2007 and will be the same in upcoming MS-Office versions interface and position may vary.
Step 1: Open Any Word Document may be existing or New.
Step 2 : Click on the office button at extreme top-Left
You will be shown a set of options as shown below.


Step 3: Click on word options button highlighted here.
                    
Step 4: A dialogue box will appear .Move to advance Option in the tabs shown on left.
You will be shown a set of options.
Step 5: Scroll down and move to Display Category options .
Uncheck “show all windows in the taskbar”.You are almost done ,now each new or existing document will open in same window.All you want know is switch between them.
How To Switch between different documents.
Step 1: Move to view tab
 
Step 2: Here you can switch between windows using different options displayed.
I have used Arrange all as an example Below:
 

Sunday, 9 February 2014

How to set password on MS Word Document

In this article, I’ll share with you a way by which you can prevent other people from opening or modifying your documents, presentations and workbooks in Microsoft Office 2007.Remember if you forgot the password document cannot be recovered so its better to have copy attached in your mail.

Step 1: Open Any Word Document may be existing or New.
Step 2 : Click on the office button at extreme top-Left

You will be shown a set of options as shown below.
Step 3: Click on Prepare button highlighted here.

Step 4:A list of options will be displayed. Select Encrypt Document .

Step 5: A dialogue box will appear enter the password and press ok .

Step 6:Reconfirm your password and save your document.

You are done !!
To remove the password just repeat above steps and give a blank password isn't it easy.


Tuesday, 4 February 2014

How To Make A Windows 7 Bootable Pendrive

Now that’s a cool trending article.No one want to spend if something can be done free of cost or available free. Same is the case with creating a windows bootable CD but why to buy a CD if your USB drive can do that.Article will let you know how you can create a windows 7 bootable pendrive using which you can install windows on any system by just using your flash drive.

Note : Format USB drive using NTFS before booting !!


What You need
  • A software that can boot USB-drive and that’s attached hereby in my article itself no where to go
  • An ISO image file of Windows 7


Step 1 : You need to download a software named unetbootin attached below.Download and use it directly no need to install its portable . 

Step 2: A dialogue box will appear. Select diskimage option and browse your system to locate an operational ISO image file of windows 7


Step 3 : Select USB drive option from drop down and mount the correct drive (USB-drive) from drop-down designated by letter when USB drive is connected like J:\


Step 4: Press OK and it will progress for 10-15 minutes to complete.

Saturday, 1 February 2014

How to Gain Blog Readers

Getting readers and distinctive users to your diary via social media channels is arguably the simplest thanks to grow the diary and therefore the blog's complete. Here square measure some tips to extend your blog's audience by investment on-line social avenues.

Increase blog reader


Tip 1: Produce Accounts at intervals widespread Social Media Portals

Creating accounts at intervals widespread social media portals will assist you to push your diary, this can be essential because it permits you to any feed the diary content into those reader-rich environments. Sites like Twitter, Facebook, and LinkedIn square measure simply a number of places wherever a blogger would move and may have access to, so as to push the diary at no price, and to with success realize people that have an interest in their blog's niche.

Tip 2: Turn out diary Content systematically

Producing diary content systematically could be a should, once venturing into the social media area, this may increase audience. Nothing will frustrate a possible diary shopper than Associate in Nursing inconsistently updated diary. exploitation social media as Associate in Nursing reaching mechanism, you will truly hurt your diary, if the potential customers return to the location and see it occasionally updated with distinctive and contemporary content. Bloggers United Nations agency treat their blogs as their solely business, United Nations agency has nice passions with multiple updates every week and not occasional hobbies with the each now-and-again diary post, square measure much more doubtless to retain the patron for any updates and active engagement.

Tip 3: Create Your diary Content Shareable With Social Sharing Tools

Enabling your diary to permit folks to 'follow' your social media profiles and showing your diary's uniform resource locator on your social media profiles square measure nice ways that to create your diary straightforward for your blog browseers to read and share data or blog's content to their social friends. By exploitation widgets, plugins, and alternative social media tools square measure useful to create your diary social-media friendly, guests to your web site will have a simple user expertise and square measure doubtless to share what they like from your diary to social sites like Digg, StumbleUpon, and Reddit.

Tip 4: Act Like Associate in Nursing Unselfish Blogger on Social Media

Engaging social media audiences with the links that are not close to your diary or from your diary, causes you to seem like Associate in Nursing unselfish blogger – this can be an amazing quality to induce across to your audience. 

Tip 5: Often Publish diary Content Into the Social Media area

One vital issue to notice for successful  diaryging is to publish content from your blog into the social media area fairly often, however there's another vital issue to recollect that isn't to be seen as somebody who's simply promoting his or her own interests all the time. Constant self-promotion is the maximum amount of a turnoff in social media because it is in world, therefore seek advice from your followers on topics associated with your diary a number of times every week and so slip your diary posts on a motion basis.

While there square measure several alternative things a blogger will do to extend a blog's visibility exploitation social media, the guidelines shown here can offer a firm footing towards taking the diary within the right direction. the subsequent square measure a number of alternative social media tips to extend diary readers:

  • Make use of appealing diary styles
  • Participate in skilled discussions
  • Add social bookmarking icon on your diary
  • Audit your diary results often
  • Provide anchor text within the author bio
  • Don't ignore your existing readers
  • Have a glance at social media updates
  • Start a podcast
  • Get Google+ profile and authorship from Google is very important
  • Conduct Webinars and Google+ Hangouts etc

How to Disable windows 7 splash screen - Faster Booting

This article will let you know how to fasten windows booting process using inbuilt windows Utility.

Windows 7 Splash Screen is the small clip that plays while booting your PC, laptop which show the windows logo saying "Starting Windows" which is around for a few seconds. Now if booting quickly is important to you then you can choose to remove and disable that splash screen which save you around 6-8 seconds of your boot time. 

I will let you know this with simple steps :

Step 1: Firstly you need to access windows system configuration utility
Open Run mode using Windows+R and type msconfig 

Step 2: A dialog box will appear 


Step 3: Go to boot Tab second from left 


Step 4: Check the No GUI boot option in second listing


Apply it and you are done !!

Copyright @ 2013 HowQuest.

Join me on Facebook Follow me on Twitter Subscribe to RSS Email me Give it a title